
If you’re still doing straight sets for 5×5, don’t be surprised when your bench press stops going up. That’s not to knock five-sets, they’re great and safe for newbies. They’ll get you benching more than your bodyweight. They probably won’t get you to 1.5 times your bodyweight and they definitely won’t get you to 2 times.
The fact is, if you want a better bench press, you need a better programme. That means you need to re-think some of your assumptions.
I want to be clear about one thing, this article is for intermediate to advanced trainees. If you’re a man who can’t bench at least 1.2 times his bodyweight, or a woman who can’t bench at least .75 times her bodyweight, you’re not ready for the programme I’m about to lay out, although items 2 and 3 on the list might still be helpful to you.
If you’ve already made serious progress on your bench press, only to find thatthe appetite for gains has grown with the eating, read on.
Cluster Sets
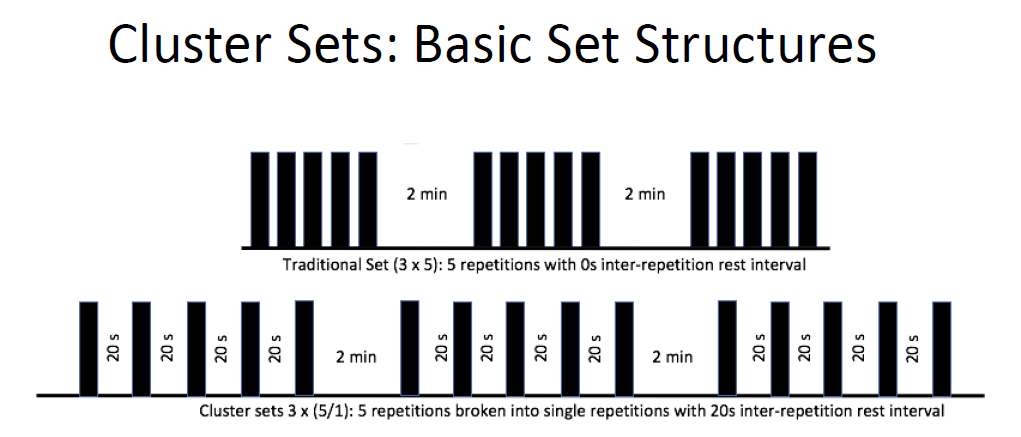
Cluster sets are a specialised training technique in which sets are divided into several (usually three) mini-sets, with short intra-set rest periods between them. In this programme, you’ll be using two different types of cluster sets for two different purposes: Building strength and practising your technique.
Strength Cluster Sets
- For strength clusters sets, you’ll use a weight that’s roughly your 3-rep max, or around 90% of your one-rep max.
- Perform two reps, then re-rack the barbell.
- Rest 20 seconds, then grab the barbell and do two more reps.
- Re-rack and rest another 20 seconds, then perform one final rep.
- That’s one strength cluster set.
- You’ll do five reps total at a weight you could normally only lift for three reps.
The advantage of strength cluster sets is clear: you can lift heavy weights for greater volume than traditional strength training methods allow.
By lifting heavy, you’re recruiting your high-threshold motor units on every rep, rather than just the later reps in each set. By doing five reps per set, you’re able to get enough volume while keeping your workouts short.
Technique Cluster Sets
Technique cluster sets are designed a bit differently from strength cluster sets. They’re designed to let you perform a large number of reps with minimal fatigue, focusing intently on your technique with each and every rep.
You’ll be using a lower weight, roughly your 6-rep max or around 80% of your one-rep max.
- Set a timer for ten minutes.
- Do one rep, then re-rack the weight and rest 15 seconds before the next rep.
- Repeat until the timer goes off.
- As you start to get fatigued, raise the rest periods in five-second increments, to a maximum of 30 seconds.
- If you reach a point where you feel like you’re not back to your full strength after 30 seconds of rest, end the set early.
The beauty of technique cluster sets is that in the space of ten minutes, you can perform about 20-30 reps, at a weight only slightly lower than you use in your working sets, all with good form and without producing enough fatigue to interfere with your strength training.
By re-racking and resting between each rep, you’re able to practice the entire movement (including picking up and re-racking the weight) with each rep rather than once per set, and by taking a short break to collect your thoughts with each rep, you’re able to focus on your technique better.
Check yourself & Check your form…on video
At least once a month, get a trusted friend to record footage of you training your bench press, preferably on one of your technique days.
Have them capture a couple reps each from the front, rear, side, and 45-degree front/side angles.
Review the footage after your workout and review it again prior to the next few bench press sessions. Specifically, make sure you’re doing the following:
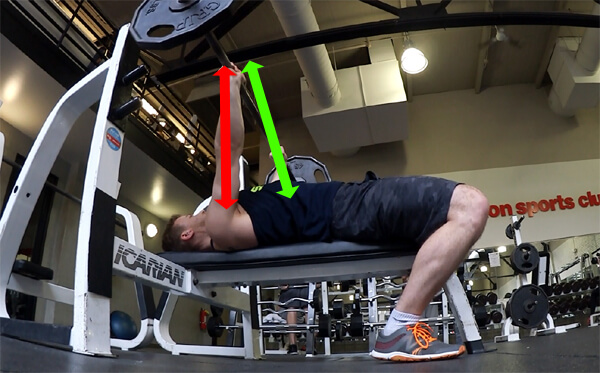
- Bar Path: A vertical bar path over the chest puts you at a mechanical disadvantage, making the bench press unnecessarily difficult and causes shoulder impingement (i.e. you’ll get hurt at high weights). You should have the bar follow a slightly diagonal path, such that it’s over your chest at the bottom of the movement, but over your shoulders at the top.
- Chest: Your chest should be raised towards the ceiling via arching your back (while keeping your glutes on the bench!) and rotating your rib cage up slightly. This shortens the bar path and points your body so that you’ll naturally press at a slight diagonal.
- Shoulders: Keep your shoulders tucked in. Squeeze your shoulder blades together like you’re trying to hold something between them. When you push the bar, your shoulders should be pressing into the bench, not pressing towards the floor on either side of the bench.
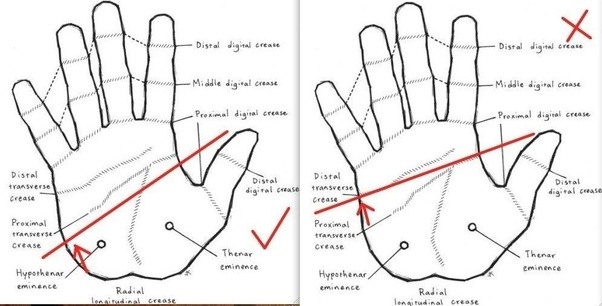
- Grip: Keep the bar low (the bar should be resting on the heel of your hand, not mid-palm) and outside on your hands (you should feel most of the bar’s weight on the outer side of your hands, below your pinkie and directly above your wrist). That keeps your wrists straight and the bar directly above your wrist and forearm.
- Elbows: Your elbows should be tucked in so that they are directly below your wrists and they should stay in that position for the entire eccentric (descent) portion of the bench press. They should not be tucked in so far that they touch your torso at any point in the movement.
- Elbows, Part 2: For the concentric (ascent) portion, things get slightly more complicated. The concentric should look like the eccentric in reverse, except that your elbows should flare out for a brief instant around the middle of the concentric portion. Done properly, this flare-out should be subtle enough that someone would have to be looking out for it to notice it.
- Feet: Foot positioning is crucial for bracing the body and supporting leg drive. Your feet should be slightly behind your knees. There are two ways to do that: either your feet can be tucked under your thighs with the heel raised off the floor, or spread out to the sides and flat on the ground.
- Leg Drive: The purpose of leg drive is not to directly aid in pushing the bar, and you shouldn’t be pushing upward with your legs. Instead, leg drive should push your body back towards your head. Done right, this helps keep your butt pressed into the bench while creating tension in the upper body, which helps the muscles of the upper body exert more force. Done wrong, it just makes your glutes lift off the bench.
- Consistency: The bar should be following the same path on every rep. It can be useful to touch the bar to your chest for this purpose, if it doesn’t touch your chest at the same place every time, you know you have a consistency issue.
- Push Yourself Away from The Bar: This isn’t a specific technique fix so much as a mental technique. Instead of thinking about pressing the bar upward, imagine you’re pushing yourself away from the bar, down into the floor.
To Pause or Not to Pause
Pausing at the bottom of each rep saps your strength and deprives you of momentum, making it harder to lift the weight back up. If your only goal is to bench as much weight as possible, don’t do it.
However, pausing at the bottom does provide a good opportunity to spot-check your form. For that reason, you may want to pause at the bottom only on technique days and only for the first few minutes of your technique workout.
On the other hand, if you’re training for a powerlifting meet or you just want to measure your max bench press in accordance with competitive powerlifting rules, you should always pause at the bottom, just as competition rules require. Train the way you compete.

Elastic Bands
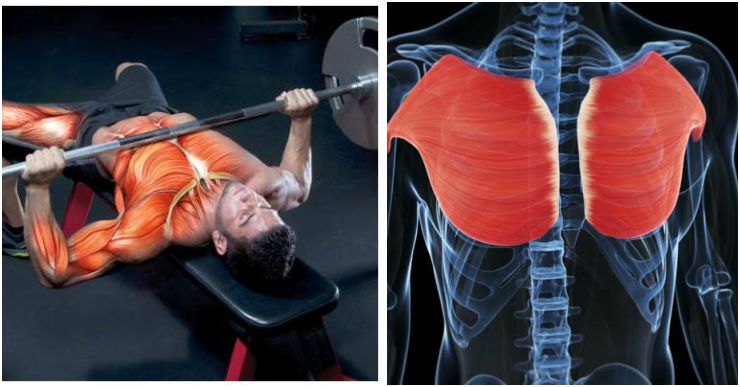
The standard bench press has one big flaw: an uneven strength curve. You’re weaker at the bottom of the motion than you are at the top. This sticking point at the bottom of the movement robs the bench press of much of its swolefication potential, particularly in the shoulders, which are maximally utilized at the top of the movement.
Thankfully there is a way (or two) to fix this defect: variable resistance training.
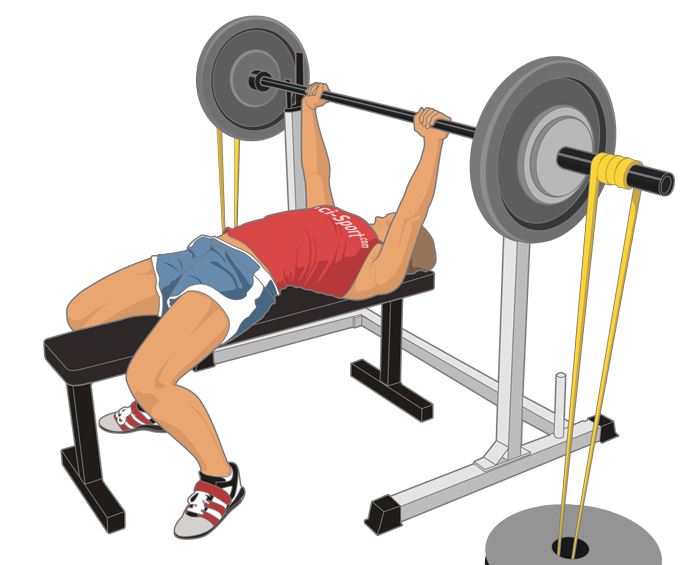
By attaching chains or elastic bands to either end of the barbell, you can cause the level of resistance to decrease as the bar gets lower, and increase as it gets higher, evening out the strength curve.
You can use elastic bands, as they did in the study, or dangle chains from either end of the barbell. I strongly prefer bands, as they’re cheaper, quieter, and easy to carry in your gym bag, or to travel with.
Regardless of which you use, the bands or chains should provide about 20% of the total resistance. In other words, when the bar touches your chest it should weigh about 80% as much as it does when your elbows lock out at the top.
So if you’re bench pressing 200 pounds, remove 40 pounds from the bar and use an elastic band that will provide roughly 40 pounds of resistance when raised to full extension.
Auto-Regulation
Giving your body just the right amount of exercise is a tricky thing. Train with too little volume and intensity, and your progress will be slower than it could be, maybe even nonexistent. But push yourself too hard, and your training program is worse than useless.
As you might have surmised, training too little is better than training too much. To that end, most training programs include more rest days than they need and/or have pre-planned de-load weeks every four to six weeks.
But there’s a whole family of techniques that can give your body precisely the optimal amount of growth stimulus it needs. They’re collectively known as auto-regulation techniques and they’re the secret sauce that elite competitors use to accelerate their results.
In a nutshell, auto-regulation allows you to increase or decrease the training stimulus on the fly, mid-workout. Rather than making those decisions based on a subjective feeling or spur of the moment decision, auto-regulation use pre-planned rules to systematise this process.
For this program, you’ll be using two such techniques (reactive de-loading and conditional contrast training): one for putting on the brakes and one for stepping on the gas.
Reactive De-Loading
When you fail to make the required number of reps on a set, you lower the weight for the remaining sets of that one exercise, just for the remainder of that workout.
Additionally, the remaining sets will be performed at high-speed, allowing you to work on building explosive strength while minimising time under tension and therefore training fatigue.
Here’s how that works with cluster sets. In this program, you’ll be doing 3 sets of 2-2-1 clusters per workout. You’ll initiate a reactive de-load if you fail to hit five good reps- either you can’t complete the fifth rep, or the fifth rep is incredibly sloppy due to fatigue, or the fourth rep is extremely sloppy due to fatigue so you don’t even try for number five.
For the bench press, you’ll want to lower the weight by about 30% for the remaining sets. You’ll also limit all remaining sets to four reps: a 2-1-1 cluster set, without that final rep.
Example: you’re benching 225 pounds, but on the first set you fail to make the final rep. You lower the weight to 165 pounds. The remaining two sets are performed as 2-1-1 cluster sets, at high speed.
Now let’s consider the opposite scenario. Suppose you complete all fifteen planned reps and after the last rep you feel like you could have kept going?
The way you do that is by incorporating post-activation potentiation (PAP), also known as contrast training. PAP is a training method wherein a heavy, low-speed compound movement is paired with a low-weight explosive movement using the same movement pattern. In this case, the bench press with plyometric push-ups.
Here’s how you’ll be using it: when you complete your third and final strength cluster set, if you made all fifteen reps and completed the last rep with good form and you feel like you have enough left in you that you could do another set, immediately get on the floor and do a set of 5-6 plyometric pushups right next to the bench.

Now you have all the tools you need.
Here are the workouts you’ll be doing
You’ll be bench pressing three or four times a week, alternating between strength days and technique days. You’ll also be starting all of your workouts, including non-bench press workouts, with a warm-up specifically designed to support bench pressing.
The Warm-Up
- Pushups: 10 reps.
- Wall stick-ups: 12 reps.
- Jump squats: 8 reps.
- Rear foot elevated kneeling hip flexor stretch: 10 reps per side.
- One-armed dumbbell rows: 8 per arm.
- Seated cable incline-decline press: 12 reps.
- Cobra pose: 4-5 reps, hold for 5-10 seconds each time.
Here’s what’s going on with this warm-up: the pushups and cable presses prime your nervous system for the bench press, while the cable incline-decline press also helps to even out your chest, both from top to bottom and left to right.
The wall stick-ups, hip flexor stretch, and cobra pose will all improve your back and hip mobility, helping you put your back and lower body into the bench press.
If you’re doing a bodyweight workout at home, replace the cable incline/decline press with 8 pike pushups. I would also perform this workout once a day on non-workout days.
Strength Workout
Bench press strength cluster set
- Sets: 3
- Reps: 2-2-1
- Rest: 20 seconds between mini-sets; 90-150 seconds after the last rep
Notes: Apply reactive de-loads and conditional contrast training as needed.
Goblet squat
- Sets: 3
- Reps: 8-10
- Rest: 90-150 seconds
One-armed dumbbell row
- Sets: 2
- Reps: 8 per arm
- Rest: 30 seconds
Dumbbell walking lunges
- Sets: 2
- Reps: 8-12
- Rest: 30 seconds
Dumbbell shoulder shrugs
- Sets: 2
- Reps: 6-8
- Rest: 60 seconds
Side plank
- Sets: 2
- Time: to fatigue each side
- Rest: 20-30 seconds
Ab suction (on hands and knees)
- Sets: 2
- Reps: 12-16
- Rest: 20-30 seconds
Note: on every exercise except the bench press, you should be stopping 2-3 reps short of failure. The idea here is to give the rest of your body enough of a workout to maintain muscle mass boost the testosterone and GH response from this workout, without compromising your recovery on the bench press.
Technique Workout
Bench press technique cluster set
- Weight: roughly your 6-rep max, or 10-15% less than what you use on strength days
- Time: 10 minutes, or until fatigued
- Rest: 15-30 seconds between reps. Start at 15 seconds and raise by 5 seconds every few minutes.
Yates bent row
- Sets: 3
- Reps: 8
- Rest: 60-90 seconds
Military press
- Sets: 3
- Reps: 6
- Rest: 60-90 seconds
Barbell front squat
- Sets: 3
- Reps: 8-12
- Rest: 60-90 seconds
Dumbbell hammer curls
- Sets: 3
- Reps: 8-10 per arm
- Rest: 60-90 seconds
Front plank
- Sets: 2
- Time: to fatigue
- Rest: 20-30 seconds
Mountain climbers
- Sets: 2
- Reps: 20-30
- Rest: 20-30 seconds
The Schedule
You’ll be doing each of these workouts two days a week, which means you’ll be benching four days a week. To prevent overtraining, you shouldn’t be lifting heavy in the gym for any additional days, but I would add in a bodyweight workout for metabolic conditioning and to hit your slow-twitch fibers.
Here’s an example of how that would look for someone working a standard Monday-Friday schedule.
- Mon: Bodyweight workout
- Tue: Strength workout
- Wed: Rest or brief cardio workout
- Thu: Technique workout
- Fri: Rest
- Sat: Strength workout
- Sun: Technique workout
Note: if you find yourself plateauing on this schedule, add two or three hundred extra calories on workout days, reduce bench pressing frequency to three times a week, and cut out all cardio, like this:
Week 1
- Mon: Bodyweight workout
- Tue: Strength workout
- Wed: Rest
- Thu: Technique workout
- Fri: Rest
- Sat: Strength workout
- Sun: Rest
Week 2
- Mon: Bodyweight workout
- Tue: Technique workout
- Wed: Rest
- Thu: Strength workout
- Fri: Bodyweight workout
- Sat: Rest
- Sun: Technique workout
Finally, once a month, add in an extra rest day and test your one-rep max on a day when it’s been three days since your last bench press workout.

Post your comment